wardmundy
Nerd Uno
- Joined
- Oct 12, 2007
- Messages
- 19,206
- Reaction score
- 5,227
UPDATED: 03/01/16
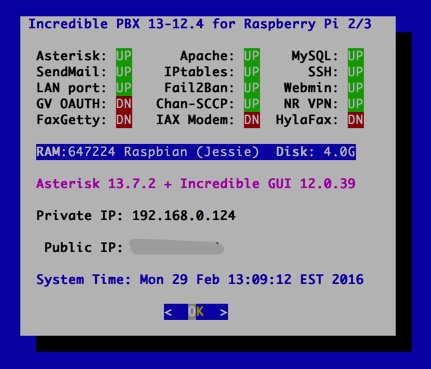
For those that have been eagerly awaiting a Raspbian 8 build of Incredible PBX with Asterisk 13 for the Raspberry Pi 2 & 3 (only!), we're ready for a few pioneers. If you find a bug, please document it here.
We wrestled with whether to release a traditional installer where you would create the base Raspbian image and then run an install script. However, the build time was nearly 3 hours after you had created the base Raspbian platform. There also were some gnarly issues with Raspbian 8 that required major changes to the previous Raspbian Wheezy installer, and we haven't had time to script all of the required changes. So we've returned to our previous methodology.
Just download and unzip the Incredible PBX image (1.5GB) of your choice from SourceForge and burn it to a microSDHC card (8GB or larger and preferably Type 10). Then boot.
2 IMAGES AVAILABLE: With and without GV OAUTH Support. Both include Incredible Fax installer.
To burn the image to an SD card with Linux, use fdisk -l to identify the correct device, e.g. /dev/sdb. DON'T ERASE YOUR HARD DISK BY MISTAKE!! Then: dd if=incrediblepbx13-raspbian8.img of=/dev/sdb. Then: sync.
Complete tutorials to create SD cards for Linux, Mac, and Windows available here.
Startup instructions:
1. Boot new SDcard image from Raspberry Pi 2 or 3.
2. From display/keyboard connected to Raspberry Pi, login as pi with password: raspberry.
3. Go through the automatic setup procedure and resize your SD card when prompted to do so.
4. Write down the IP address of your RasPi. Reboot.
5. Following reboot, log in using SSH/Putty from a remote PC. Username: root Password: password
6. Complete setup steps by resetting all of your passwords at the prompts.
Nerd Vittles tutorial: http://nerdvittles.com/?p=17094
Google Voice OAUTH tutorial: http://nerdvittles.com/?p=14787 (Steps 8-10)
Known bugs:
None reported.
Last edited:

 Phone System