wardmundy
Nerd Uno
- Joined
- Oct 12, 2007
- Messages
- 19,202
- Reaction score
- 5,225
CAUTION: Alpha Code! This is for Bleeding Edge Pioneers Only!

We've almost gotten Fedora 20 tamed so that you can use the standard PIAF3 installer to load PBX in a Flash on top of a base install of the 64-bit PIAF-FC20 Live Desktop Remix ISO (from us) or Fedora 20 Live Desktop Edition (from fedora.org). Fedora 20 is a very different beast than CentOS 6.5 so you'll need to get used to the "improvements." Most of it will be coming to CentOS 7.0 (now that RHEL 7 is available). It's also worth mentioning that Fedora 20 runs on the BeagleBone Black so this will provide a PIAF path to BBB down the road.
All of this experimentation has been using VirtualBox so here goes...
Caution: If you choose to use a different virtual machine platform, you're on your own. I'm not going to fix it, investigate it, or make suggestions. I doubt others will either. Choice of platform is your option so long as YOU take responsibility for getting it to work.")
NOTE: A prebuilt VM appliance for VirtualBox is available from SourceForge. After downloading to your desktop, follow the old Nerd Vittles tutorial for VirtualBox to get it going.
Installing the Fedora Remix or Fedora 20 Platform
Download either the 64-bit PIAF-FC20 Live Desktop Remix ISO (from us) or 64-bit Fedora 20 Live Desktop ISO (from fedora.org)
Create a new Fedora 20 Virtual Machine in VirtualBox
PIAF3 Installation Procedure
We've almost gotten Fedora 20 tamed so that you can use the standard PIAF3 installer to load PBX in a Flash on top of a base install of the 64-bit PIAF-FC20 Live Desktop Remix ISO (from us) or Fedora 20 Live Desktop Edition (from fedora.org). Fedora 20 is a very different beast than CentOS 6.5 so you'll need to get used to the "improvements." Most of it will be coming to CentOS 7.0 (now that RHEL 7 is available). It's also worth mentioning that Fedora 20 runs on the BeagleBone Black so this will provide a PIAF path to BBB down the road.
All of this experimentation has been using VirtualBox so here goes...
Caution: If you choose to use a different virtual machine platform, you're on your own. I'm not going to fix it, investigate it, or make suggestions. I doubt others will either. Choice of platform is your option so long as YOU take responsibility for getting it to work.
NOTE: A prebuilt VM appliance for VirtualBox is available from SourceForge. After downloading to your desktop, follow the old Nerd Vittles tutorial for VirtualBox to get it going.
Installing the Fedora Remix or Fedora 20 Platform
Download either the 64-bit PIAF-FC20 Live Desktop Remix ISO (from us) or 64-bit Fedora 20 Live Desktop ISO (from fedora.org)
Create a new Fedora 20 Virtual Machine in VirtualBox
- Type: Linux
- Version: Fedora
- RAM: 1024MB
- Default Drive Options with 20GB space
- Create
- Settings->System: Enable IO APIC and Disable HW Clock (leave rest alone)
- Settings->Audio: Enable
- Settings->Network: Enable, Bridged
- Settings->Storage: Far right CD icon (choose your ISO) and click Live CD/DVD
- Start
- Start your Virtual Machine
- Start Fedora Live (be patient while it loads)
- Click: Install to Hard Drive
- Choose Language and Click Continue
- Click: Install Destination (do not change anything!)
- Click: Done
- Click: Continue (to autoconfigure disk)
- Click: Begin Installation
- Click: Root Password: password, password, Click Done twice
- Click: User Creation: admin, admin, password, password, Click Done twice
- Wait for Software Install and Setup to finish
- Click Quit
- Click Activities and Search for terminal
- Click Terminal icon
- shutdown -h now
- Close the VM window and choose Power Off Machine
- Settings->Storage: Click on Fedora Live ISO, Click (-) icon to remove, Click Remove, OK
- Restart Virtual Machine
- Accept default kernel for boot
- Click Admin user, enter password, Accept.
- Choose Language, Keyboard.
- Ignore Link to Data in Cloud, Next.
- Start Using Fedora.
- X to close Gnome Help window.
- Activities, Search: terminal, Terminal.
- su root
- init 3
- login as root
- ln -sf /lib/systemd/system/multi-user.target /etc/systemd/system/default.target
- service sshd start
- chkconfig --level 2345 sshd on
- ifconfig (decipher IP address for SSH login)
- shutdown -h now
- Restart Virtual Machine
- Login as root using SSH after VM is running and...
Code:
cd /etc/yum.repos.d
# change gpgcheck=0 for all repos
yum -y install httpd* php wget nano iptables-services
sed -i 's|SELINUX=enforcing|SELINUX=disabled|' /etc/selinux/config
systemctl enable httpd.service
systemctl start httpd.service
systemctl stop firewalld.service
systemctl status firewalld.service
chkconfig --level 2345 firewalld off
cd /root
wget http://pbxinaflash.com/piaf3-install.tar.gz
tar zxvf piaf3-install.tar.gz
./piaf3-install
PIAF3 Installation Procedure
- Allow automated Phase 1 Install to complete (2,000+ new components added or updated)
- Phase 2: Following reboot, choose option C to exit to command prompt
- piafdl
- Flavor: PIAF-Green
- Enable make menuconfig option: Y <-- important--> double the size of your default SSH window!
- Time Zone: your choice
- FreePBX: 2.11
- Master password: your choice
- When menuconfig opens, press down arrow, right arrow, left arrow, and X (don't change anything)
- Wait for reboot and login again. The post-install script will run and leave you with a functional system.
- Zend Guard Loader requires Zend Engine API version 220090626. Installed Zend Engine API version 220121212 is newer.
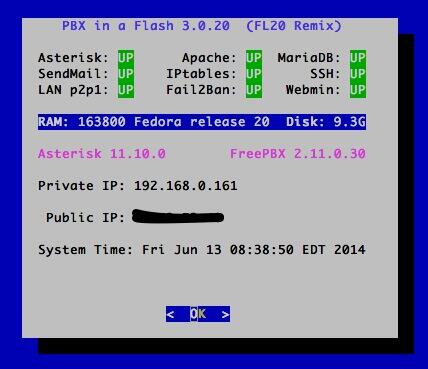
- .statusnet broken. ipaddress doesn't show in original status. Fedora doesn't rely on ethX ports any longer so we've built an interim version that works (see image above).
- PIAF/FreePBX password stuff is a mess (run behind a hardware-based firewall!!!)

 Phone System